Honeycomb Blonde Curls

Before imageAfter image

“Taking Deja’s hair from black to a luscious honeycomb tone took lots of planning beforehand. I first did a strand test because, during our consultation, it was revealed she had box black color on her hair. I utilized bigger sectioning to speed through her application process and decided to keep her bright and blonde by toning her a honey-beige hue. Using Blonde Life Lightening Powder helped me achieve the lift I wanted while maintaining the strength and shine of the hair.”

COLOR FORMULASClient: Deja has level 3 box color

PREP TREATMENT: Defy Damage ProSeries 1: Bond-Protecting Color Optimizer Spray

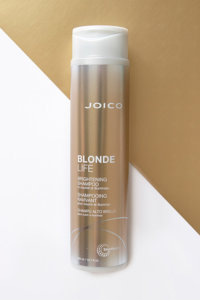
FORMULA 1: Blonde Life Lightening Powder with 10 Volume LumiShine Developer (working up to 25 Volume)

FORMULA 2: (Teardrop Toner) LumiShine Demi-Permanent Liquid Color 6NA + 7N with 5 Volume LumiShine Developer

FORMULA 3: (Toner) LumiShine Demi-Permanent Liquid Color 10V + 8N + 9NV with 5 Volume LumiShine Developer

POST TREATMENT: Defy Damage ProSeries 2: Bond-Strengthening Color Treatment

TECHNIQUE

STEP 1:
Prep with Defy Damage ProSeries 1. Shake the can vigorously and then spray in short bursts to 2-inch sections and comb for even distribution.

STEP 2:
For client comfort, direct the hair and spray away from the face.

STEP 3:
Start by section the head down the middle with a large mohawk. The sectioning should curve with the shape of the head. To measure the width of the mohawk, lay a foil down on the center of the head and take the width of your foil. This should be about middle of brow to middle of brow width.

STEP 4:
Starting at the bottom nape of the mohawk, take large weave horizontal partings, tease the base slightly, and apply Formula 1 (making sure to feather the formula where the tease starts). This will effortlessly create a beautiful blend and shade the roots at the same time.

STEP 5:
Take a fine slice parting and apply Formula 1 to create a baby light. Continue this large weave + babylight application working up through to the top of the mohawk section.

STEP 6:
As you work with the teasing, it should be compacted in and “pushed” into the root area instead of an erratic tease. This will help with control and the combing out process.

STEP 7:
Once you get to the top, if you are working with a lot of hair, stop and check your work. If the hair is ready to be rinsed, proceed with the rinsing process in that area to prevent over lightening hair.

TIP: If there are sections that need to be rinsed early, shampoo and rinse thoroughly, then apply Defy Damage ProSeries 2 and clip away while you continue your lightening application. Continue this application process throughout the entire mohawk. Working in this same large weave + babylight manner, starting at the front side hairline, take diagonal forward partings, and apply Formula 1. Continue your application until both sides are completed.

STEP 8:
Process your prelightening application until you reach level 8. Shampoo with Blonde Life Brightening Shampoo. Thoroughly towel dry the hair and proceed to the toning process.

STEP 9:
Apply Formula 3 to the mids and ends first to tone the blonde to a beautiful honeycomb color.

STEP 10:
Then, apply Formula 2 to the base and melt into the mids and ends. This method allows you to melt the color exactly where you want it to be and process all at the same time. Process for 5-20 minutes or until the hair is toned to desired results. Shampoo with Blonde Life Brightening Shampoo. Apply Defy Damage ProSeries 2 for 5 minutes to rebuild and restrengthen the bonds in the hair. Rinse and style as desired with your favorite Joico styling products.

MORE BLONDE AMBITION

Ice Pixie

Before imageAfter image

“ A blonde pixie?! Yes please! I love when clients want to get creative and try new things with their hair. Briana has beautiful rich brown level 4 hair that I knew needed the lifting power of Blonde Life®. Blonde Life Lightening Powder would be the right product to achieve the desired results while maintaining the integrity of the hair during the process.”

COLOR FORMULASClient: Briana has natural Level 4
Prep Treatment: Defy Damage ProSeries 1: Bond-Protecting Color Optimizer
Formula 1: Blonde Life Lightening Powder with 20 (6%) Volume LumiShine Developer
Formula 2: Blonde Life Lightening Powder with 30 (9%) Volume LumiShine Developer
Formula 3: (Root Tap) LumiShine Demi-Permanent DD Crème 6NA + 6SB with 5 (1.5%) Volume LumiShine Developer
Formula 4: (Toner) LumiShine Demi-Permanent DD Crème 10SB with 5 (1.5%) Volume LumiShine Developer
Post Treatment: Defy Damage ProSeries 2: Bond-Strengthening Color Treatment

Technique

STEP 1:
Prep with Defy Damage ProSeries 1. Shake the can vigorously and then spray in short bursts to 2-inch (5cm) sections and comb for even distribution.

Tip: When working on short hair, use a fine tooth comb to spray and comb ProSeries 1 at the same time for even saturation.

STEP 2:
Section out a horseshoe parting along the curvature of the head, the parietal ridge.

STEP 3:
Before starting to highlight your client, analyze the hair fall, texture, and density. This will guide you on where to start. When you start to highlight; take fine, micro-weaves when highlighting in the back. This application should be feathered and blended using Formula 1. Be sure, when working in the back, not to take too wide of a section so you do not create a line.

STEP 4:
When working in the back area, take diagonal micro-weaves working throughout the back.

STEP 5:
Continue to work throughout the back in the same manner. This highlighting manner should be completed in the back to the crown where you took the horseshoe parting.

STEP 6:
Continue until the back is completed. Check your foils for processing. If the back is light enough to your desired results, rinse, shampoo, and condition.

STEP 7:
Starting in the front sides, take diagonal back micro-weaves and continue highlighting the lower horseshoe portion. Make sure to analyze the hair on the sides like you did in the back to ensure you are starting your highlighting on the correct length of hair to avoid creating lines or spots.

STEP 8:
Working into the top section from back to front, take diagonal weave partings and apply Formula 2. Starting at the crown, take many diagonal forward weaves to highlight the top section. Don’t leave any hair out to create a massive impact. As you work along, continue to feather the formula at the root. This will create a seamless rooted look for an easy grow out for your client while creating depth and dimension.

STEP 9:
Continue your highlighting application until the top section is fully complete. Go back and check your work, saturation, and monitor the lifting process. If there are sections of the head that are lifted to where you need, it is a great idea to rinse those areas first while letting the other sections continue to process. Rinse and shampoo with Joico Blonde Life Brightening Shampoo. Towel dry the hair gently and continue on to the tap and tone process.

STEP 10:
Using Formula 3, tap the base throughout the entire head. When working in the shorter length sections, use a comb to move the hair out of the way when doing your root tap so not to overlap your formula onto the blonde. Make sure to glide the root tap formula over the line of demarcation to create a blend and correct any spots you may have as you work along. Apply Formula 4 to the mids and ends. Process until desired results are achieved.

STEP 11:
Rinse and Shampoo with Joico Defy Damage Protective Shampoo. Apply Defy Damage ProSeries 2 throughout the head to restrengthen and rebuild the bonds of the hair. Process for 5 minutes. Dry and style the hair using your favorite Joico Stylers.

MORE BLONDE AMBITION